Sunday 20 May 2018

OSGI Service Configuration and its resolution order

OSGI is a fundamental element in the technology stack of Adobe Experience Manager (AEM). It is used to control the bundles of AEM and their configuration.

OSGI bundles or components can be composed into an application and deployed and they can be stopped, installed, started individually. The interdependencies are handled automatically. Each OSGI Component is contained in one of the various bundles.

In the cases when you don't want to hardcode the values in the code eg. some host url or some parameter which is dynamic and can be changed frequently or the value which is different for each runmode of your aem instance, in those cases you use OSGI configuration.

By defining configuration values, you can define values used by an OSGI service and use these values while the service is running. Unlike hard-coding values in an AEM OSGI service, defining values in the AEM configMgr lets you change values without re-compiling the bundle.

You can manage the OSGI configuration settings for such bundles by :

  • Adobe CQ Web console - The Web Console is the standard interface for OSGI configuration. It provides a UI for editing the various properties, where possible values can be selected from predefined lists. Any configurations made with the Web Console are applied immediately and applicable to the current instance, irrespective of the current run mode.

  • Content-nodes (sling:osgiConfig) in the repository - This requires manual configuration using CRXDE Lite. You can create sling:OsgiConfig nodes according to a specific run mode in different config folders. You can even save configurations for more than one run mode in the same repository. Any appropriate configurations are applied immediately (dependent on the run mode).

  • Creating a OSGI Configuration service - 


    Use the below Java class example to create an osgi config service:
    package com.foo.community.core;
    
    import java.util.Map;
    import org.apache.felix.scr.annotations.Activate;
    import org.apache.felix.scr.annotations.Component;
    import org.apache.felix.scr.annotations.Deactivate;
    import org.apache.felix.scr.annotations.Modified;
    import org.apache.felix.scr.annotations.Property;
    import org.apache.felix.scr.annotations.Service;
    import org.apache.sling.commons.osgi.PropertiesUtil;
    import org.osgi.service.component.ComponentContext;
    
    
    @Component(immediate=true, metatype=true)
    @Service({MyConfig.class})
    public class MyConfig
    {
      @Property(label="Sample Property", value={"property1"}, 
        description="Sample property to demonstrate osgi config")
      private static final String SAMPLE_PROPERTY = "sampleProperty";
      private String sampleProperty;
      
      public MyConfig() {}
      
      public String getSampleProperty()
      {
        return sampleProperty;
      }
      
      @Activate
      protected void activate(Map context)
      {
       sampleProperty = PropertiesUtil.toString(context
         .get("sampleProperty"), "property1");
      }
      
      @Deactivate
      protected void deactivate()
      {
       sampleProperty = null;
      }
      
      @Modified
      protected void modified(ComponentContext context)
      {
       sampleProperty = PropertiesUtil.toString(context
          .getProperties().get("sampleProperty"), "property1");
      }
    }
    
    
    Notice that in the above code I have used SCR annotations to create a service but those annotations are deprecated now, so you can use OSGI annotations instead.
    To know more about scr annotations refer this page.

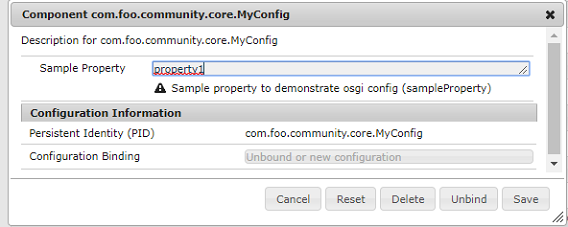
    OSGi Configuration with the Web Console -

    You can access the Configuration tab of the Web Console by:
    http://localhost:4502/system/console/configMgr
    then search for the MyConfig, you can see the config we created above as below:

    OSGi Configuration with the Repository (CRX Nodes) -

    To add the new configuration to the repository:
    • Go to your project folder- /apps/<yourProject>, then create the config folder (sling:Folder):
                config - applicable to all run modes
                config.<run-mode> - specific to a particular run mode
    • Under this folder create a node:
               Type: sling:OsgiConfig
               Name: the persistent identity (PID)
               for eg. in our case-  com.foo.community.core.MyConfig
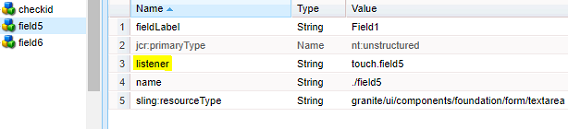
    • For each parameter that you want to configure, create a property on this node:
              Name: the parameter name(shown in brackets) in the Web console;
              Type: as appropriate.
              Value: as required.

    Below is the screenshot of the config I created for global and author runmode-


    It's xml representation (com.foo.community.core.MyConfig.xml) is shown below:
    <?xml version="1.0" encoding="UTF-8"?>
    <jcr:root xmlns:sling="http://sling.apache.org/jcr/sling/1.0"
        xmlns:jcr="http://www.jcp.org/jcr/1.0"
        jcr:primaryType="sling:OsgiConfig"
        sampleProperty="Value edited from crx author"/>
    
    Reading config values through Javascript Use-API:

    Use the below JS Use-API code snippet to use the config value and return to sightly-

    var global = this;
    use(function () {
        if (global.sling && global.Packages) {
           var myConfigService = global.sling.
               getService(global.Packages.com.foo.community.core.MyConfig);
        }
     var sampleProperty = myConfigService.getSampleProperty();
    
        return {
            sampleProperty : sampleProperty
        };
    });
    
    To read osgi config values through Java, refer this post.

    Resolution Order of the configurations-


    Resolution Order at Startup-

    The following order of precedence is used:
    • Repository nodes under /apps/*/config of type sling:OsgiConfig.
    • Repository nodes with type sling:OsgiConfig under /libs/*/config.
    • Any .config files from <cq-installation-dir>/crx-quickstart/launchpad/config/ on local file system.

    Resolution Order at Runtime-

    Configuration changes made while the system is running trigger a reload with the modified configuration.
    Then the following order of precedence applies:
    • Modifying a configuration in the Web console will take immediate effect as it takes precedence at runtime.
    • Modifying a configuration in /apps will take immediate effect.
    • Modifying a configuration in /libs will take immediate effect.

    Saturday 19 May 2018

    Internationalization (I18n) in AEM using Sightly, JS and Java

    AEM enables you to internationalize strings which allows you to display localized strings in your UI.
    Internationalization (i18n) is a process of translating your content (strings) in different languages according to your requirement.
    You can internationalize strings in the following types of resources:
    • Java source files.
    • HTML using Sightly
    • Javascript in client-side libraries or in page source.
    First of all, create a i18n folder of type sling:folder under your project folder in apps, then create a json file of your language name and add jcr:mixinTypes as mix:language from tools option in crx bar and then add a property jcr:language and value as your language code as shown below:

    The content of en.json will be key-value pairs in json format for each language file. eg:
    en.json

    {
     "Hello {0} !! This is coming from {1}" : "Hello {0} !! This is coming from {1}",
     "key.java" : "This is coming from Java"
    }
    fr.json
    {
     "Hello {0} !! This is coming from {1}" : "Bonjour {0} !! cela vient de {1}",
     "key.java" : "Cela vient de Java"
    }
    The advantage of having the above json approach over creating sling:messageEntry node and then adding sling:key and sling:message property is, in a single json file you can enter as much key-value entries for your message instead of creating node each time for each message entry.

    Translator to manage Dictionaries in AEM -


    AEM provides a console for managing the various translations of texts used in component UI.
    Use the translator tool to manage English strings and their translations. The dictionaries are created in the repository, for eg. in our cas/apps/training/i18n.

    The tranlsator console is available at http://localhost:4502/libs/cq/i18n/translator.html

    Below is the screenshot of our entries in i18n folder shown in this console:


    Using i18n in Java code -


    The com.day.cq.i18n Java package enables you to display localized strings in your UI. The I18n class provides the get method that retrieves localized strings from the AEM dictionary. To include this package, add the below dependency in your pom.xml
    <dependency>
        <groupId>com.day.cq</groupId>
        <artifactId>cq-i18n</artifactId>
        <version>5.4.0</version>
        <scope>provided</scope>
    </dependency>
    
    Below java class demonstrate the use of I18n class and how to translate content:
    package com.foo.community.core;
    
    import java.util.Locale;
    import java.util.ResourceBundle;
    import com.day.cq.i18n.I18n;
    import com.adobe.cq.sightly.WCMUsePojo;
    
    public class I18nUtility extends WCMUsePojo{
     
     private String val;
     Locale locale;
     ResourceBundle resourceBundle;
     
     @Override
     public void activate() throws Exception {
      
         locale = new Locale("en");
         if(getResourcePage().getPath().contains("fr")){
      locale = new Locale("fr"); 
         }
         resourceBundle = getRequest().getResourceBundle(locale);
         I18n i18n = new I18n(resourceBundle);
         val = i18n.get("key.java"); 
     }
     public String getVal() {
      return val;
     }
    }
    
    
    You can also get the page locale by using:
    Locale pageLang = currentPage.getLanguage(false);


    Using i18n in Sightly code -


    This is the simplest way to use i18n in aem, just you have to use the @i18n with the key name
    and you will get output according to your page locale.
    For eg.
    <p> ${"Hello {0} !! This is coming from {1}" @ i18n, 
       format=['Prasanna','Sightly'], context='html'} </p>
    
    <p data-sly-use.i18j = 'com.foo.community.core.I18nUtility'>${i18j.val}</p>
    
    As you can see from the above code, I have passed 2 parameters as an argument to dynamically generate the translation content. So whatever will be inside {} will be treated as to be replaced by dynamic arguments.

    Now I am printing the above value along with using java class and the value returned from it in sightly code. Below screenshot shows the output in English and French page-


    Using i18n in Javascript code -


    The Javascript API enables you to localize strings on the client. 
    The granite.utils client library folder provides the Javascript API. To use the API, include this client library folder on your page. Localization functions use the Granite.I18n namespace.
    Below is the example of using i18n in JS:
    Granite.I18n.setLocale("en");
    if(window.location.href.indexOf("fr")>=0){
       Granite.I18n.setLocale("fr"); 
    }
    alert(Granite.I18n.get("Hello {0} !! This is coming from {1}"
       ,['Prasanna', 'Javascript']));
    
    Below screenshot of the English and French page shows the JS alert of how to use i18n in js by passing dynamic arguments as parameter:


    Now you can pickup the method which ever you want to use and get started with the internationalization in AEM.

    References https://helpx.adobe.com/experience-manager/6-3/sites/developing/using/i18n-dev.html

    Sunday 6 May 2018

    Maven - A simplistic start to an AEM project


    Apache Maven is an open-source project management and comprehension tool that automates builds and provides quality project information, and it’s the recommended build management tool for AEM projects.

    Maven archetype for AEM project-

    It's not possible whenever you want to create a new AEM project; you manually create the folder, files and the whole project structure, that is where the maven archetypes come in picture. Maven archetypes provide us with predefined project structure templates for AEM.

    With the help of maven archetypes, a developer can create a new project which will be in a way with the best industry practices and recommended by Adobe.

    Maven archetypes also include a sample project, which helps developer to get introduced to best practices and features employed by maven.
    Using an Archetype 10 or above project, you are given a set of files to start with.

    Maven Setup:

    • Download Maven(Binary zip file) from http://maven.apache.org/download.cgi
    • Extract the zip file to your C directory
    • Create new environment variables and enter values of java and maven path: 
               JAVA_HOME - C:\Program Files\Java\jdk1.8.0_31
               M3_HOME - C:\apache-maven-3.5.3-bin\apache-maven-3.5.
    • Edit Path environment variable and add jdk bin path(if not already added) and maven bin path:
              %M3_HOME%\bin; %JAVA_HOME%\bin
    • Test if Maven is properly configured by typing below command in command prompt (It should give you maven and java home and versions)mvn –version
    • Create .m2 folder for maven repository:
             Go to C:\Users\(your user name), create .m2 folder and create a file settings.xml (you can              copy the content of settings.xml from here ) in that folder.

    Creating a Maven archetype 12 project-

    To create an AEM archetype (version 12) project, perform these steps:
    • Open the command prompt and go to your project folder.
    • Run the following Maven command:
    mvn org.apache.maven.plugins:maven-archetype-plugin:2.4:generate -DarchetypeGroupId=com.adobe.granite.archetypes -DarchetypeArtifactId=aem-project-archetype -DarchetypeVersion=12 -DarchetypeCatalog=https://repo.adobe.com/nexus/content/groups/public/ 
    • When prompted, specify the following information:

    • Once done, you will see a message like:


    • And your working directory is added with below project structure:


    Add Maven project in Eclipse:


    •        Click on File-> Import -> Maven -> Existing Maven Projects
    •        Select the project from your drive, click Finish:


    You can see below files and packages in Eclipse, and accordingly you can add/modify files.

     After you import the project into Eclipse, notice   each module is a separate Eclipse project:
            ·  core - where Java files that are used in OSGi   services and sling servlets, sling models are located
            ·  launcher - where additional Java files are located
            ·  tests - Java files for tests like JUNIT tests
            ·  apps - content under /apps
            ·  content - content under /content
    When you want to create an OSGi service, you work under core. Likewise, if you want to create a HTL component, you can work under apps.


    Code Deployment in AEM using maven:


    To build the OSGi bundle by using Maven, perform these steps:

    ·         Open the command prompt and go to your project folder.
    ·         Run the following maven command: mvn -PautoInstallPackage install.
    ·    After the build success, the OSGi bundle can be found in the following folder: (you folder path)\MyProject\core\target. The name of the OSGi bundle is MyProject.core-1.0-SNAPSHOT.jar.
    The above command automatically deploys the OSGi bundle and apps package to AEM.
    ·   Make sure after you deploy code, your bundle is in active state, you can check it at http://localhost:4502/system/console/bundles


          ·  Also, you can see the following components and items installed in your crxde along with a sample page inside content named MyProject.


    Dependency Mechanism in Maven

    Dependency management is one of the features of Maven that is best known to users and is one of the areas where Maven excels. There is not much difficulty in managing dependencies for a single a project, but when you start getting into dealing with multi-module projects and applications that consist of tens or hundreds of modules this is where Maven can help you a great deal in maintaining a high degree of control and stability.

    When you have a set of projects that inherits a common parent it's possible to put all information about the dependency in the common POM and have simpler references to the artifacts in the child POMs.
    For ex: you can add the below dependency in the parent POM of the project like this:
    <dependency>
              <groupId>com.adobe.aem</groupId>
              <artifactId>uber-jar</artifactId>
              <version>6.3.0</version>
              <classifier>apis</classifier>
              <scope>provided</scope>
    </dependency>
    And have its reference in the core POM.xml as below:
    <dependency>
             <groupId>com.adobe.aem</groupId>
             <artifactId>uber-jar</artifactId>
             <classifier>apis</classifier>
    </dependency>

    The above JAR file (uber-jar) contains all of the public Java APIs exposed by Adobe Experience Manager. It includes limited external libraries as well, specifically all public APIs available in AEM. 
    The minimal set of information for matching a dependency reference against a dependency Management section is actually {groupId, artifactId, type, classifier}. But we can shorthand the identity set to {groupId, artifactId}, since the default for the type field is jar, and the default classifier is null.
    So, now you are good to go!! Just create your project and start developing.


    Tuesday 1 May 2018

    Touch UI - Hide/Show Fields in the dialog in AEM by selection/checkbox

    In this post, I'll cover 2 methods to hide/show fields in the touch UI dialog of AEM.
    One is the OOTB method provided by aem for toggling fields based on dropdown selection field and other method is toggling fields programmatically based on any resourceType (checkbox, selection etc.) 

    Method 1 -
    This method uses some class and attributes provided by AEM OOTB which is applicable to only toggle fields based on dropdown selection and thus is the easiest way to achieve hide/show.

    First, you have to add below 2 properties to the selection field as shown below:

    class : cq-dialog-dropdown-showhide
    cq-dialog-dropdown-showhide-target : .list-option-listfrom-showhide-target


    Then, add another 2 properties to each child container which you want to show/hide based on dropdown selection:
    class : hide list-option-listfrom-showhide-target
    showhidetargetvalue : field11

    Thus for any child containers which you want to hide/show- add a class property which matches the data-target attribute of selection field as shown above and add another property of showhidetargetvalue with value equal to dropdown options value.


    Method 2 -

    This method is a generic method and you can use it to hide/show fields based on any resourceType like chekbox or selection etc. Here, I'll toggle fields using jQuery logic written in a js file inside clientlibs folder with category cq.authoring.dialog .

    To use this method, add any attribute (I've added listener) to checkbox(or selection) field and child fields which you want to toggle and give any value which u'll be using it as an identifier in js file as shown below:


    Now, use the below logic applied when the dialog is loaded and fetch the checkbox value using listener and toggle fields whichever you want using listeners. 
    (function (document, $) {
        'use strict';
     var CHECKBOX_LIST = 'touch.checkbox';
     var FIELD5_LIST = 'touch.field5'
     var FIELD6_LIST = 'touch.field6';
    
    $(document).on("foundation-contentloaded",function () {
    
     var $dialog = $(document).find('.cq-dialog');
    
     function showhideCheckbox() {
       var isChecked = false;
       var isTextfield = false;
       var el = $dialog.find("[data-listener='" + CHECKBOX_LIST + "']");
       if (el[0] !== undefined) {
     isChecked = el[0].checked;
       }
       if (isChecked === true) {
     $dialog.find("[data-listener='" + FIELD5_LIST + "']").parent().show();
     $dialog.find("[data-listener='" + FIELD6_LIST + "']").parent().hide();
       }  
       else {
     $dialog.find("[data-listener='" + FIELD5_LIST + "']").parent().hide();
     $dialog.find("[data-listener='" + FIELD6_LIST + "']").parent().show();
       }
    }
    
      var checkBtn = $("[data-listener='" + CHECKBOX_LIST + "']").closest('.coral-Checkbox');
      if (checkBtn.length === 1) {
     showhideCheckbox();
     checkBtn.on('click', function () {
      showhideCheckbox();
     });
      }   
    });
    })(document,Granite.$);
    

    And at the last, if you are using acs-commons package in your project, then it already provides showhidedialogfields.js in clientlibs which you can directly use without using any of the above methods.
    It provides an extension to the standard dropdown/select and checkbox component. But It enables hiding/unhiding of multiple dialog fields based on the selection made only in the dropdown/select or on checkbox check.