Apache Maven is an open-source project management
and comprehension tool that automates builds and provides quality project
information, and it’s the recommended build management tool for AEM projects.
Maven archetype for AEM project-
It's not possible whenever you want to create a new AEM project;
you manually create the folder, files and the whole project structure, that is
where the maven archetypes come in picture. Maven archetypes provide us with
predefined project structure templates for AEM.
With the help of maven archetypes, a developer can create
a new project which will be in a way with the best industry practices and
recommended by Adobe.
Maven archetypes also include a sample project, which
helps developer to get introduced to best practices and features employed by
maven.
Using an Archetype 10 or above project, you are given a
set of files to start with.
Maven Setup:
- Download Maven(Binary zip file) from http://maven.apache.org/download.cgi
- Extract the zip file to your C directory
- Create new environment variables and enter values of java and maven path:
JAVA_HOME - C:\Program Files\Java\jdk1.8.0_31
M3_HOME - C:\apache-maven-3.5.3-bin\apache-maven-3.5.
- Edit Path environment variable and add jdk bin path(if not already added) and maven bin path:
%M3_HOME%\bin; %JAVA_HOME%\bin
- Test if Maven is properly configured by typing below command in command prompt (It should give you maven and java home and versions): mvn –version
- Create .m2 folder for maven repository:
Go to C:\Users\(your user name), create .m2 folder and create a file settings.xml (you can copy the content of settings.xml from here ) in that folder.
Creating a Maven archetype 12 project-
To create an AEM archetype (version 12) project, perform
these steps:
- Open the command prompt and go to your project folder.
- Run the following Maven command:
mvn org.apache.maven.plugins:maven-archetype-plugin:2.4:generate
-DarchetypeGroupId=com.adobe.granite.archetypes
-DarchetypeArtifactId=aem-project-archetype -DarchetypeVersion=12
-DarchetypeCatalog=https://repo.adobe.com/nexus/content/groups/public/
- When prompted, specify the following information:
- Once done, you will see a message like:
- And your working directory is added with below project structure:
Add Maven
project in Eclipse:
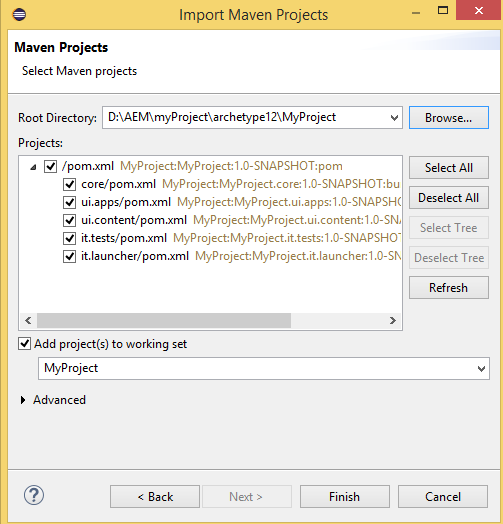
- Click on File-> Import -> Maven -> Existing Maven Projects
- Select the project from your drive, click Finish:
You can see below files and packages in Eclipse, and accordingly you can add/modify files.
After you import the project into Eclipse, notice each module is
a separate Eclipse project:
· core - where Java files that are used in OSGi services and sling
servlets, sling models are located
· launcher - where additional Java files are located
· tests - Java files for tests like JUNIT tests
· apps - content under /apps
· content - content under /content
When you want to create an OSGi service, you work under core.
Likewise, if you want to create a HTL component, you can work under apps.
Code
Deployment in AEM using maven:
To build the OSGi bundle by using Maven, perform these
steps:
·
Open the command prompt and go to your project
folder.
·
Run the following maven command: mvn -PautoInstallPackage install.
· After the build success, the OSGi bundle can be
found in the following folder: (you folder path)\MyProject\core\target.
The name of the OSGi bundle is MyProject.core-1.0-SNAPSHOT.jar.
The above
command automatically deploys the OSGi bundle and apps package to AEM.
· Make sure after you deploy code, your bundle is
in active state, you can check it at http://localhost:4502/system/console/bundles
· Also, you can see the following components and
items installed in your crxde along with a sample page inside content named MyProject.
Dependency
Mechanism in Maven
Dependency
management is one of the features of Maven that is best known to users and is
one of the areas where Maven excels. There is not much difficulty in managing
dependencies for a single a project, but when you start getting into dealing
with multi-module projects and applications that consist of tens or hundreds of
modules this is where Maven can help you a great deal in maintaining a high
degree of control and stability.
When you have a set of projects that
inherits a common parent it's possible to put all information about the
dependency in the common POM and have simpler references to the artifacts in
the child POMs.
For ex: you can add the below
dependency in the parent POM of the project like this:
<dependency>
<groupId>com.adobe.aem</groupId>
<artifactId>uber-jar</artifactId>
<version>6.3.0</version>
<classifier>apis</classifier>
<scope>provided</scope>
</dependency>
And have its reference in the core POM.xml
as below:
<dependency>
<groupId>com.adobe.aem</groupId>
<artifactId>uber-jar</artifactId>
<classifier>apis</classifier>
</dependency>
The above JAR file (uber-jar) contains all of
the public Java APIs exposed by Adobe Experience Manager. It includes limited
external libraries as well, specifically all public APIs available in AEM.
The minimal set of information for
matching a dependency reference against a dependency Management section is
actually {groupId, artifactId, type, classifier}. But we can
shorthand the identity set to {groupId, artifactId}, since the
default for the type field is jar,
and the default classifier is null.
So,
now you are good to go!! Just create your project and start developing.


No comments:
Post a Comment